Owli – A Buddy on the Desk
2016-02-20This master’s class project at University College London was intended for designing a companion for teenagers while they study. It could be a clock, a cup, a toy. The targeted user group was set to children aged from 10 to 15. Two design idea scenarios were proposed prior to the class: The first one is a playful toy and the second one are shoes. As a motivation for implementing more interactive products, a final design centered a toy which could assist children in learning and developing skills.
Problem to solve
When facing a great number of tasks in front of the desk, students’ motivation, productivity and creation are greatly influenced by different factors. This idea is centered on a group of people with great curiosity, desire for innovative and emotional products.

Design space | Scenario
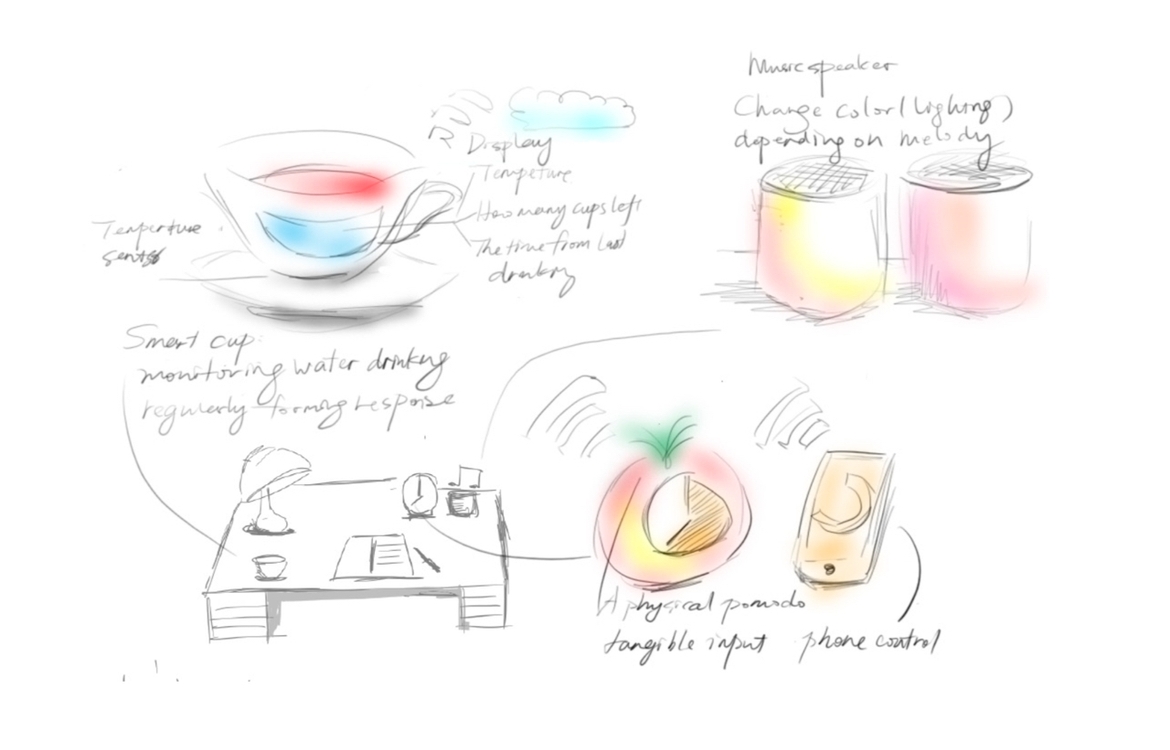
A scenario of studying space was demonstrated for understanding the potential functions and how the product could be incorporated into the space. Some regular articles on the desk:
- Lighting: relax, warm
- Clock: productivity
- Sound box: fun, recuperation
- Coffee/water cup: health, energy
Design brainstorm based on these functions in the workspace with some design alternatives
- Water monitor: Monitor water drinking status and give suggestions with optional alarm.
- Desk-Pomodoro: A timer with 25 mins interval for working and 5 mins for rest in order to keep productivity.
- Music speaker: Color could change with the music

Ideation
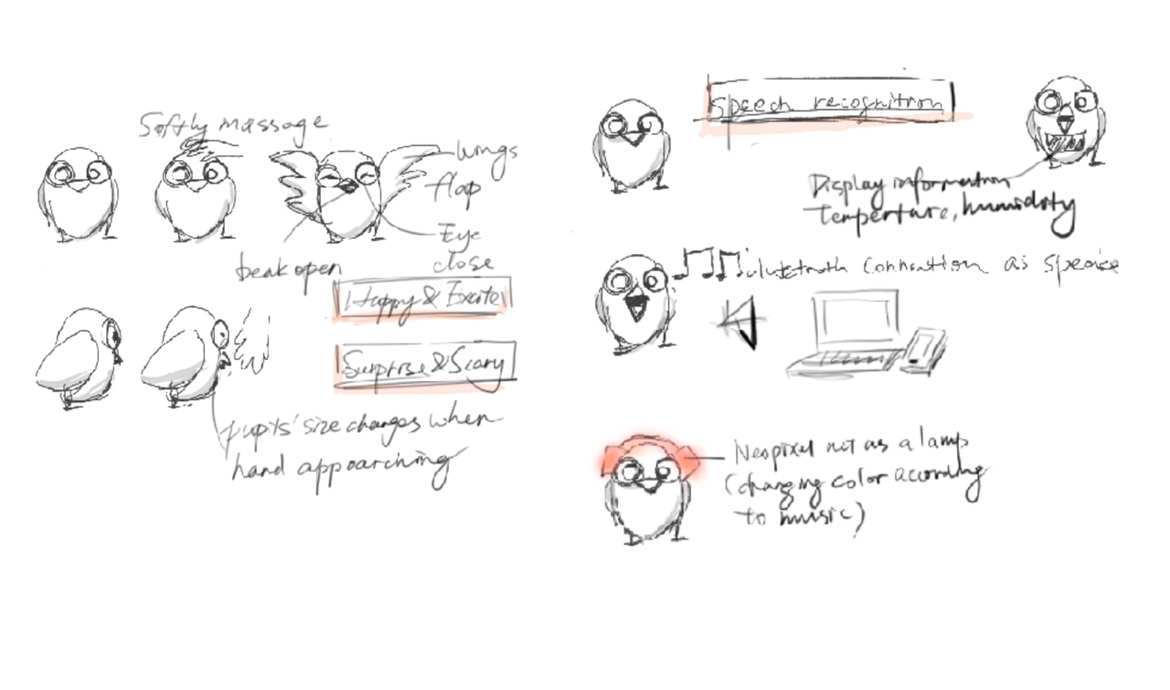
For building the emotion connection, a bird-shaped toy was generated, which could respond to users’ touching and soothing. It will build another interaction layer with the targeted users.

Low fidelity prototype – Look and feel
CMF
The look of the bird will deliver different images to users. Several images were considered during design: the pigeon, the penguin and the owl. After a comprehensive consideration of size and the symbolic meaning of the bird, the owl was selected as the product image, since the owl also symbolizes intelligence, teaching and alarm, which is most suitable in the work space. The product is named OWLI.

Size and material
Before arranging the components into the outline, an exploration of the size and material was helpful for understanding how the interior structure will be. Different sizes of prototypes were arranged in the scenarios. Both 2D and 3D paper prototypes were built to get an impression of how the interactions will work. It could be detected that a small size is preferable, however given the interactions designed before, it is very difficult to implement the design in a cup size. There will be some compensation between size and interactions. For the material, a fluffy design fit better into the centered age group, as it is cute, more desirable to approach.
Interaction exploration | Mechanical structure design
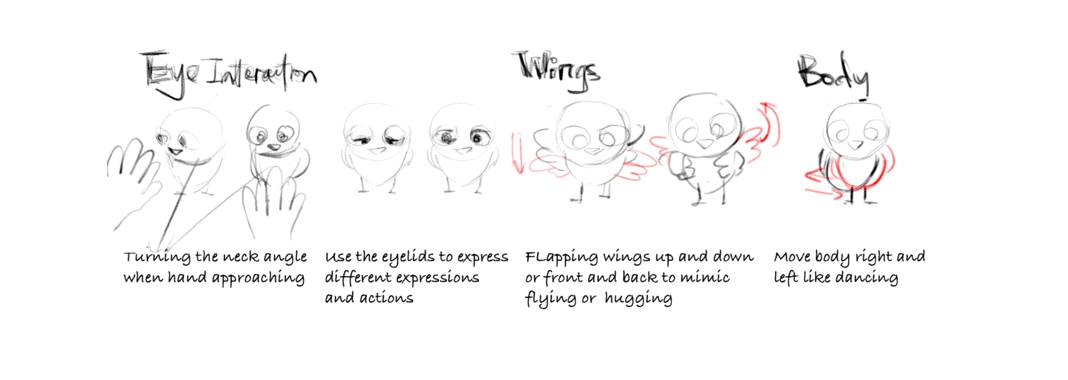
The interaction of Owli was also expanded and redesigned, feasible components were considered: LDR (light dependent resistor), proximity sensor, and infrared sensor could detect human body movements; Servo motors could be the actuators for the toy’s action responses.
 Servo motors were selected for implementing emotional
 interactions: blinking the eyelids and flapping the wings.
Eyelids
At the beginning, two plans were proposed. In Plan A, the servo motor was arranged at the back side of head. The rotation of servo motor will drive the support of eyelids move up and down. Meanwhile, the gravity of eyelids itself will make them rotate. The advantage is that here level theory was applied and the force from servo motor will be less and solid material of support could be used. However, in this small prototype, this structure was rather limited and components were rather hard to integrate in this small container.
Plan A needs rather a big space and is unstable in the prototype. In Plan B, the servo motor was arranged at the side of Owli’s head. In this structure, the rotation of the servo motor directly drives the rotation of the eyelid support and is very reliable when programming actions, such as speed, rotation. Moreover, as the servo motor and eyelid support are in the same line, the total space occupation is also less in Plan B. Finally, after analysis and implementation comparison, Plan B was chosen for the final prototype.
Wings
In the same way, during the wings design, two servo motors were used. This makes the programming of wings actions more versatile. Another reason, this design occupies less space comparing to the design with one driving servo motor.

Electronics components exploration
Some comparisons between different sensors and actuators were made to get a better understanding of how to implement the design. For example, the LCD is more appropriate for delivering information than 7-segment tubes; proximity sensors can get more detailed information than infrared sensor;aAs well as the parameters such as servo motors’ precision and rotation scope; force sensors’ accuracy and sensitivity. A selection of input and output components were set as below:

Circuit design
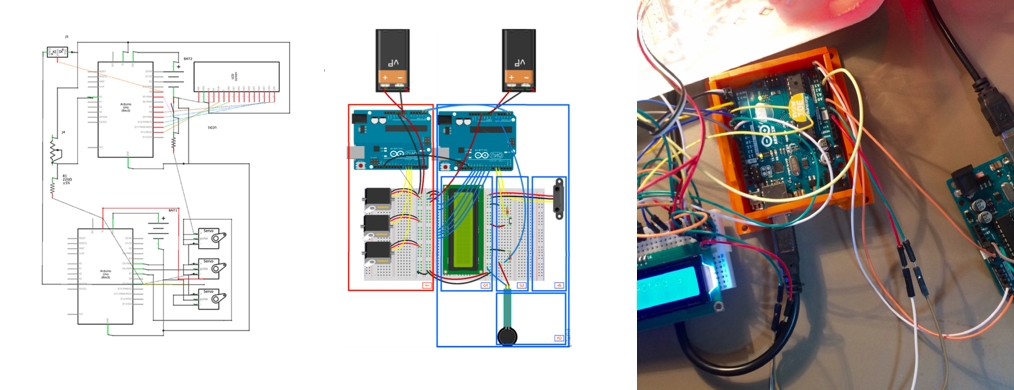
After the electronics exploration, sensors and actuators were selected. As the pins of one Arduino UNO were rather limited plus the servo motors influence the overall voltage stability, an extra Arduino was used individually for controlling the servo motors. The two Arduinos communicated by connected analog pin4 and pin5.
- A separate Arduino with power supply to control 3 servo motors
- LCD screen
- Button and protection resistor
- Proximity sensor
- Force sensor

Voice recognition
Thanks to voice recognition, Owli’s interaction was more intelligent. Voice commands include:
- ‘Hello’ - Robot voice ‘Hello dear’
- ‘Rainbow’ - Change light’s color
- ‘Right’ - Wave right wing
- ‘Tomato’ - Pomodoro mode
- ‘Tweet’- Speak a sentence to Owli and it will be sent as a tweet. Some basic command conversation was programmed. The perspective on entertainment and ease of use of Owli was enhanced.
High fidelity prototype | Digital fabrication & handcraft
3D model design
A 3D model was designed at the beginning, for understanding the interior structure and for later printing. However, regarding the limited access to 3D printers, the outline structure was created by laser cutting combined with hand cutting the plastic structure.
Laser cutting design & implementation
A box containing the interior components was designed, which need to load two Arduino boards and a lot of wires but also needs to be included into a fluffy coat. The refinement of the plastic structure was iterated several times. A support of the eyelid was also cut by the laser cutter, however as the size of the drill was not perfect and the material was acrylic sheet which is not easy to adjust, a wooden stick was used instead.

Soldering & integration

